In this quick post, we’ll be going over how you can manage your DNS records for your domain(s) in DigitalOcean and why you might want to do this. Let’s jump right in!
Why Add your Domain to DigitalOcean?
The simple answer to this question is that it will make your life a whole lot easier. Especially if a majority of your servers and other resources live within DigitalOcean.
Let’s go over a common use case: creating a new subdomain. Imagine you want to start a blog, so the first thing you do is provision a new WordPress server. If you are not managing your DNS records in DigitalOcean then you have to go through a couple extra tedious steps to complete this task. This would involve:
- Making note of the IP of your new server
- Logging in to your domain registrar
- Adding the new A record pointing to your WordPress server
Instead, if you had your domain pointing to DigitalOcean Nameservers then all you have to do is simply create a new A record. The nice thing about DigitalOcean is when you are filling in a value for any DNS record, they will automatically give you a list of all the resources in your account which makes this very easy to identify a resource by name instead of remembering IP addresses. Take a look below:

You may think that the couple extra steps are not that big of a hassle. But, as your account grows and your use cases expand, you will come to appreciate how easy it is to manage DNS records with the resources in your account. You’ll no longer have to go to different registrars and remember what’s what. An additional benefit of having your domains on DigitalOcean is that it will allow you to take advantage of automatic TLS/SSL certificate management when using them in combination with Load Balancers and Spaces.
How to Add your Domain to DigitalOcean
Below we will go over the generic steps it takes in order to manage DNS records for a domain within DigitalOcean. This simply involves pointing your domain’s current nameservers to DigitalOcean’s nameservers. We will be using NameCheap as the example domain registrar. However, the same steps will apply to other registrars such as Google Domains, Domain.com, DreamHost, HostGator, GoDaddy, etc.
1. First, log in to your domain registrar’s website. This is typically where you purchased the domain unless you did a domain transfer at any point to another registrar. If you do not know your domain’s registrar, you can use a website like https://www.whois.com/whois/ to look it up quickly.
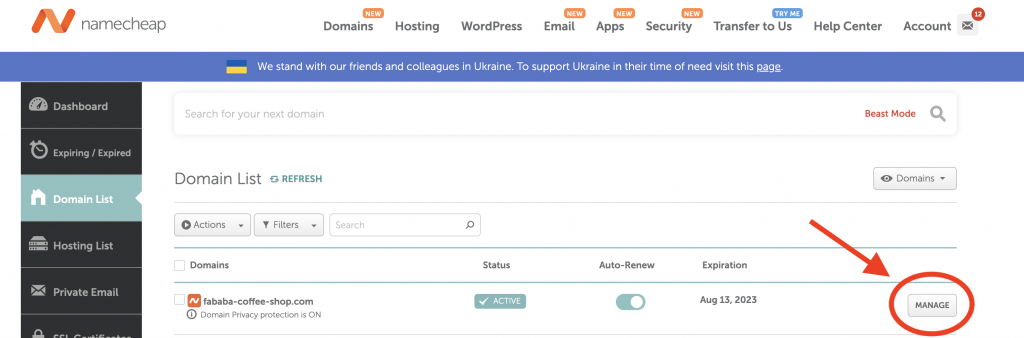
2. Second, locate your domain within your account and find where you can manage its settings. In NameCheap, go to the list of your domains by clicking “Domain List” after logging in. Then click “Manage” next to the domain that you want to make changes to.
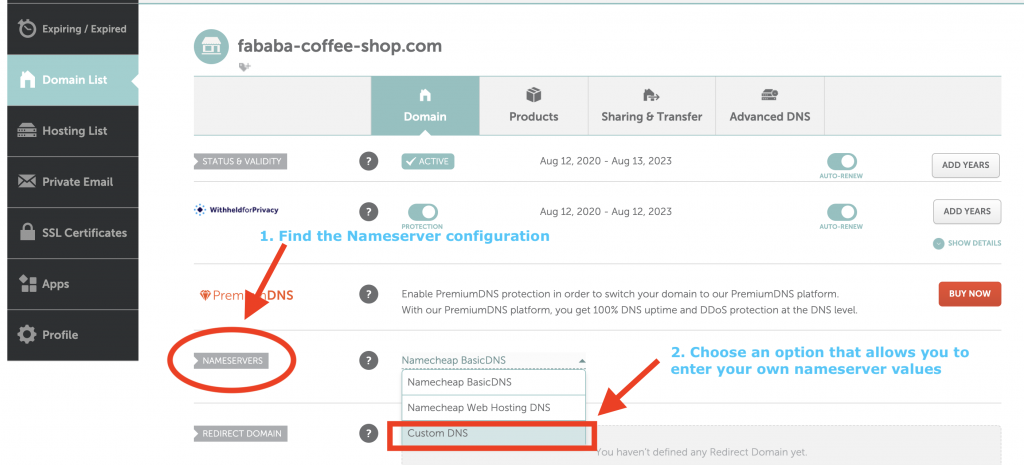
3. Next, you’ll want to find the part of your domain settings where you are allowed to change the “Nameservers”. We’ll be entering our own custom values here.
4. Finally, you’ll want to update your domain’s nameservers to point to the following values:
ns1.digitalocean.com
ns2.digitalocean.com
ns3.digitalocean.com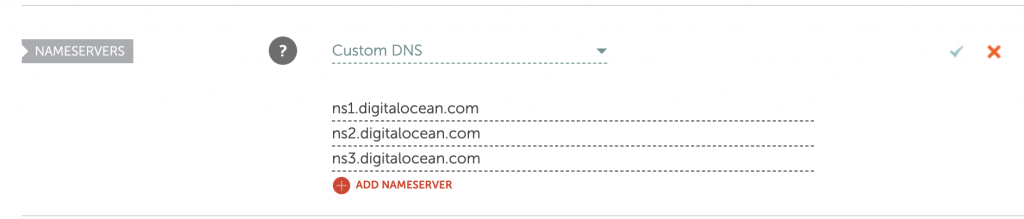
This is what gives DigitalOcean the authority to manage records of your desired domain. Once this step is complete, it may take some time for these new records to propagate and become effective. This could be anywhere from a few minutes to a few hours. At this point, you should be all set and able to create, update, and delete all the DNS records you want right from within your DigitalOcean account.
It is important to note that while you can manage your DNS records within DigitalOcean, you’ll still need to do your domain renewals through your domain registrar.
Summary
Managing your DNS records for a domain within DigitalOcean is as simple as updating the nameservers of your domain. Any domain registrar that’s worth their salt will make it easy to find the nameserver configuration section within a couple minutes. Most will likely have support articles explaining exactly where to go.
Hopefully, this post gives you the high-level steps of what is required to add your domain to DigitalOcean, the benefits of doing so, and a good direction on how to do so depending upon your domain registrar.